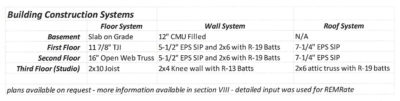
Mountain Construction Enterprises of Boone, NC had this home energy audit performed in order to retrofit a home to higher energy efficiency standards. This is the first step in a green building remodeling job. For more information or free consultation CONTACT US
Home Energy Audit Findings & Report
Prepared By: Nicholas Hurst, Travis McKenzie & Landon Williams, Appalachian State University Department of Technology, Advanced Building Science.
I. Introduction
Thank you for the opportunity to evaluate this home as a part of our coursework in the Department of Technology at Appalachian State University. We performed this home energy audit as thoroughly as possible given our time constraints and relatively short experience in the field. Additional monitoring of the home's mechanical systems could always be performed to maximize energy efficiency, but we feel confident that our findings will offer potential remedies for the majority of the home's shortcomings in this area. Overall, we felt that this home was carefully crafted and constructed using quality materials and sufficient exterior insulation, with only a few notable leakage areas in the building envelope. We hope this evaluation is as educational for you as it was for us. Thanks again for this opportunity and for your genuine concern for home energy improvement.
II. Overview of Primary Inspection Areas
During this energy audit, our team evaluated four primary areas of concern for the homeowner:
1. Building durability issues
2. Gas leakage
3. Air leakage through the building envelope
4. Duct system design and installation issues
The first two areas were addressed during the preliminary visual inspection of the exterior of the home, as well as throughout the interior envelope inspection. The building envelope was evaluated with a blower door test, and the heating, ventilating, and air conditioning (HVAC) system was tested for duct leakage. No testing or service was performed on the HVAC unit itself, however, this should be done annually by a trusted heating contractor.
III. Visual Inspection
Building Durability
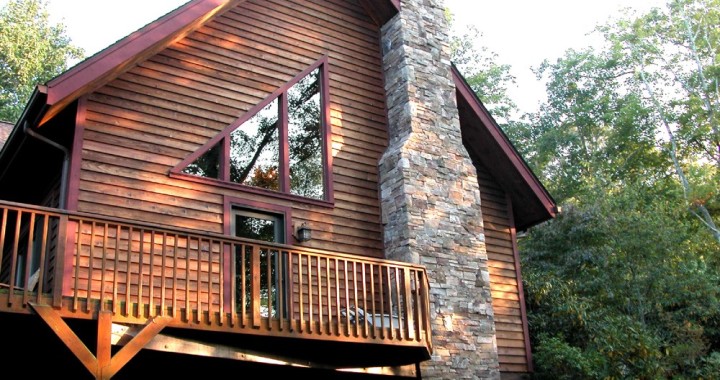
We began our energy audit with a visual inspection of the exterior of the home. Walking around the outside of the house, we noticed only a few areas of concern:
1. Water stains on lower porch ceiling
2. Front landscaping sloped toward the house
3. Exterior trim/siding near ground level on front.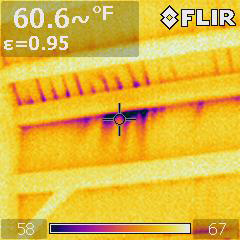 The water stains are likely being caused by rainwater from the deck above, accumulating on the lower porch ceiling and collecting on the plywood surface from a penetration or unsealed seam in the bituminous membrane above. This is a cosmetic issue and long-term durability problem, but there is no cause for concern for leakage to the interior of the house.
The terrain in the front landscaping slopes toward the house instead of away from it. Although there were no visible signs of moisture in the basement, this should be monitored to make sure that bulk surface water stays away from the house. Unfortunately, the exterior siding and trim is already too close to the ground in this location, so additional fill or mulch should not be added.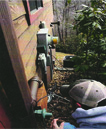
All penetrations in the building envelope were accounted for inside after the inspection of vents and stacks. Vents seemed to be located appropriately and were functioning well.
 Gas Leakage
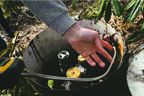
Using a gas leak detector, propane lines at the house were checked and appeared to be well-maintained. However, upon inspection of the underground propane tank head, we discovered a gas leak near the regulator, which we immediately reported to the homeowners. The gas company was called, and the problem was addressed during the energy audit. This finding was consistent with the homeowners' complaints of exorbitantly high gas bills throughout the winter.
IV. Combustion Air Zone (CAZ) Depressurization
 The heating unit for the home is a class IV combustion appliance, a 90% AFUE propane furnace. A 13 SEER air conditioning unit is used for cooling. Building Performance Institute (BPI) specifies a depressurization limit of -50 Pascals in the CAZ for sealed combustion appliances of this type. Ideally, we would have been able to test for worst case depressurization in the CAZ to ensure the health and safety of the occupants after air sealing and energy retrofit. Due to access limitations in the mechanical closet and time constraints on the project, we were unable to perform a CAZ depressurization test for combustion safety. However, we tested ambient CO in the CAZ and throughout the home during the blower door test, with no significant CO readings during furnace operation. Given the fact that the furnace was a high efficiency unit, we feel that it would be unlikely that the few small exhaust sources in the house would have contributed to high enough depressurization to meet or exceed the limit of -50 Pascals in the CAZ.
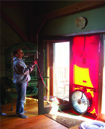
V. Blower Door Test
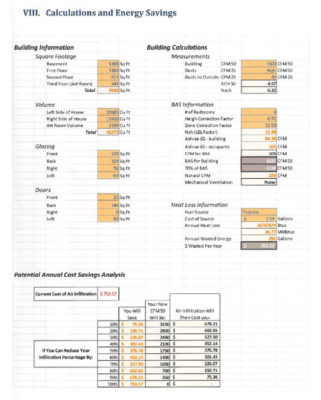
The team set up the blower door test unit in a rear entrance door on the main floor. The blower door test revealed about 3500 cfm50 air leakage in the house, which had an equivalent leakage area (ELA) of 450 square inches. This is equal to about a 1'x 3' hole in the building envelope. Building Performance Institute recommends ventilation calculations for the Minimum Building Airflow Standard (BAS) be performed according to ASHRAE 62-89.
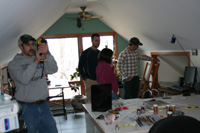
Thermal Inspection of Studio
Air infiltration around baseboard
Air leak behind beam in loft with thermal image
The calculated BAS of 1625 cfm50 revealed that no additional ventilation is required. In fact, the building had a few significant air leaks in the envelope, primarily in the upper two levels. It is difficult to give exact estimates on the reduction in air infiltration after weatherization. However, if infiltration in the envelope can be reduced from 3500 cfm50 to the recommended BAS of 1625 cfm50, the homeowners should recover about $400/year in energy costs for propane heating alone. These calculations are shown in the tables under Section VIII-Calculations and Energy Savings.
The primary air leaks were in the attic studio around the kneewall closets between the trim and the sheetrock and between the baseboard and floor. Secondary air leaks were found around the recessed lights on the second floor landing, around fixture boxed in stick-framed walls, and behind some timber beams in the vaulted ceiling. The following pictures show some of the primary areas of concern for air infiltration.
VI. Duct Blaster Test
The team set up the duct blaster in the return on the main floor to pressurize the ducts and determine the 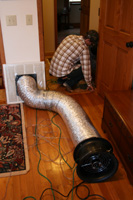 duct leakage to the outside. All known supply and return registers were sealed off. Despite turning up the duct blaster to maximum flow, we could not achieve 25 Pascals of pressure in the duct system (only 2 Pa) and could not get a cfm reading.
After unsuccessfully scouring the entire house for an uncovered register, we decided to remove the return registers (4) to trace the duct path back to the air handler. In doing so, we learned that the returns were run laterally with the flex duct, but vertically through stud wall cavities, potentially accounting for some of the pressurization difficulties we were having. Stud cavities used as duct plenums are generally not sealed with caulk during installation, and are therefore prone to some air leaks around studs and plates. The back of the sheetrock in the visible cavities also had significant dust and dirt accumulation.
Having accounted for all of the return chases terminating into the air handler, we visually inspected the return plenum and found that there was a large hole hidden from view in the top of the duct box. We placed a temporary masking cover over the hole and covered the returns again in order to pressurize the system. After turning the duct blaster back on, we could still only reach a pressurization of 12 Pascals, indicating there was still significant leakage in the duct system.
Because we knew that all of the ducts were located in conditioned space, the leakage in question was not likely to contribute to major energy losses. The overall performance of the system and general comfort might be compromised, however, with unmanageable pressure differences throughout the home. For confirmation, we decided to perform a blower door – duct blaster depressurization test to verify total duct leakage to outside. While depressurizing the house to -25 Pascals, we reversed the fan direction, installed the flow conditioner and flow ring three, and depressurized the system to -25 Pascals. The duct system proved to have only 48cfm leakage to outside.
After relaying our experiences to the homeowners, they recalled that there may have been a supply duct intended for the toe-kick under the kitchen sink which never got installed or terminated. This, too, confirmed our suspicions that the duct system was, in some way, leaking significantly into the building through the stud walls or between floors.
VII. Recommendations Summary
Repair Gas Leak
The homeowners addressed this concern immediately. The gas company made a trip the same day to repair the regulator at the propane tank.
Air-Seal Fixtures in Exterior Envelope
Remove trim kits on recessed lights and caulk between sheetrock and metal light housing to avoid air infiltration. Fire-caulk all wire penetrations in the same fixture boxes. Likewise, caulk between fixture boxes and sheetrock in any stick-framed walls (studio receptacles and ceiling fan, e.g.) and seal hole in master closet above fluorescent light fixture.
Air-Seal In Attic Studio
Use clear caulk to carefully seal all gaps between trim and sheetrock or flooring. Remove baseboard where possible and foam or caulk between sheetrock and framing/flooring.
Address Attic Insulation
Because there were built-in shelves covering the attic kneewall hatch, access was limited to this area. A visual inspection of the insulation in this area was therefore unfeasible. However, thermal images during the blower door test revealed air leakage around the hatch in addition to many of the trim boards. When the homeowner intends to pursue significant air-sealing in the studio, this access hatch should be opened up for inspection. Any non-IC rated recess cans that are accessible in the attic should be changed to air-tight, IC-rated fixtures (Air-tight Insulation Contact) with CFL bulbs or LED capability for long-term energy reduction. These fixtures should then be covered with a minimum of 12" of loose-fill cellulose or other well-installed blanket insulation. The junction between the stud walls and floor joists in the studio should also be blocked off, air sealed, and thoroughly insulated. Visual inspection of the kneewall insulation should reveal tight insulation with no compression and no more than 1/8" wide gap near any framing members. The back of the attic hatch should also be insulated with 4" of Thermax foam board, and the hatch should be weather-stripped and well-fastened to minimize air leakage.
Duct Repair and Cleaning
The hole in the return plenum should be permanently repaired. Upon visual inspection of the return chases in the walls, there was significant dust and dirt on the backside of the sheetrock. A duct cleaning may improve indoor air quality.
VIII. Calculations and Energy Savings
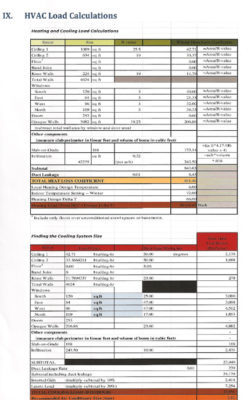
IX. HVAC Load Calculations
Learn more about Green Building.
Mountain Construction does custom home building in any building style, including conventional new homes, remodeling and restorations, log homes, timber frame homes and structural insulated panel homes. Check out our site and learn more about our Construction and Remodeling services.
You are welcome to reprint this articles on your website and in your e-newsletter provided that: you don't change the article in any way and you included the by-line along with a link to this website.